


Debian 9 代号 Stretch 在 2017 年 6 月 18 号正式发布,由于是最新的系统,原来基于 Dotdeb 安装最新 LEMP 的教程已经过时,本文将介绍使用官方源和第三方源在 Debian 9.x Stretch 安装最新版 LEMP 的教程,并且可以自行选择 PHP 版本。
PS:本文同时适用于 Debian 8.x Jessie 如果您的服务商暂未提供 Debian 9.x 也可以凑合一用
以下安装步骤都在 root 用户下完成,请自行使用 su 命令切换到 root用户
1、更新系统并安装部分必要软件
apt-get update && apt-get upgrade
apt-get install curl vim wget sudo unzip apt-transport-https lsb-release ca-certificates
由于 Debian 9.x 刚发布, Backports目前还没有软件,如有后续升级的必要,也可以加入 Backports 源,方便未来升级
cat >> /etc/apt/sources.list.d/backports.list << EOF
deb http://ftp.debian.org/debian $(lsb_release -sc)-backports main
EOF
后续等 Backports 陆续有新版本的软件后,也可以执行升级
apt-get -t stretch-backports update && apt-get -t stretch-backports upgrade
当然现在暂时没必要,否则会提示
E: The value 'stretch-backports' is invalid for APT::Default-Release as such a release is not available in the sources
2、增加 Nginx 官方源并安装
由于 Debian 官方打包组在 2 月份就已经截止打包所有软件,所以 Nginx 在官方源里一直停留在 1.10.3 而 1.12.0 已经发布两个月,我们可以使用 Nginx 官方的源进行安装
2.1 首先增加 Key
wget http://nginx.org/keys/nginx_signing.key
apt-key add nginx_signing.key
2.2 然后增加 Nginx 官方源
cat >> /etc/apt/sources.list.d/nginx.list << EOF
deb http://nginx.org/packages/debian/ $(lsb_release -sc) nginx
deb-src http://nginx.org/packages/debian/ $(lsb_release -sc) nginx
EOF
2.3 接着更新并接安装 Nginx
apt-get update
apt-get install nginx
注意:不要安装 nginx-extras 这个包是 Debian 官方打包的,而不是 Nginx 官方打包。
安装完毕后,我们可以使用 nginx -v 命令看到 Nginx 已经是最新的 1.12.0 稳定版了
root@debian9 ~ # nginx -v
nginx version: nginx/1.12.0
3、修改 Nginx 配置
由于 Nginx 官方打包的源基本只是个最小化 Nginx,所以我们有必要针对性修改,首先,可以修改 /etc/nginx/nginx.conf ,参考内容如下
user www-data;
worker_processes auto;
pid /run/nginx.pid;

events {
    worker_connections 768;
    # multi_accept on;
}

http {

    ##
    # Basic Settings
    ##

    sendfile on;
    tcp_nopush on;
    tcp_nodelay on;
    keepalive_timeout 65;
    types_hash_max_size 2048;
    server_tokens off;

    # server_names_hash_bucket_size 64;
    # server_name_in_redirect off;

    include /etc/nginx/mime.types;
    default_type application/octet-stream;

    ##
    # Logging Settings
    ##

    access_log /var/log/nginx/access.log;
    error_log /var/log/nginx/error.log;

    ##
    # Gzip Settings
    ##

    gzip on;
    gzip_disable "msie6";

    gzip_vary on;
    gzip_proxied any;
    gzip_comp_level 6;
    gzip_buffers 16 8k;
    gzip_http_version 1.1;
    gzip_types text/plain text/css application/json application/javascript text/xml application/xml application/xml+rss text/javascript;

    ##
    # Virtual Host Configs
    ##

    include /etc/nginx/conf.d/*.conf;
    include /etc/nginx/sites-enabled/*;
}
删除默认的 default.conf
rm -rf /etc/nginx/conf.d/default.conf
新建立一个 sites-enabled 目录用来存放网站配置
mkdir -p /etc/nginx/sites-enabled
为了避免所有网站文件都使用一堆重复的配置文件,我们可以参考 Debian 的 Nginx 配置,把一些 PHP 配置文件单独提取出来
新建 /etc/nginx/fastcgi.conf 内容如下
fastcgi_param  SCRIPT_FILENAME    $document_root$fastcgi_script_name;
fastcgi_param  QUERY_STRING       $query_string;
fastcgi_param  REQUEST_METHOD     $request_method;
fastcgi_param  CONTENT_TYPE       $content_type;
fastcgi_param  CONTENT_LENGTH     $content_length;

fastcgi_param  SCRIPT_NAME        $fastcgi_script_name;
fastcgi_param  REQUEST_URI        $request_uri;
fastcgi_param  DOCUMENT_URI       $document_uri;
fastcgi_param  DOCUMENT_ROOT      $document_root;
fastcgi_param  SERVER_PROTOCOL    $server_protocol;
fastcgi_param  REQUEST_SCHEME     $scheme;
fastcgi_param  HTTPS              $https if_not_empty;

fastcgi_param  GATEWAY_INTERFACE  CGI/1.1;
fastcgi_param  SERVER_SOFTWARE    nginx/$nginx_version;

fastcgi_param  REMOTE_ADDR        $remote_addr;
fastcgi_param  REMOTE_PORT        $remote_port;
fastcgi_param  SERVER_ADDR        $server_addr;
fastcgi_param  SERVER_PORT        $server_port;
fastcgi_param  SERVER_NAME        $server_name;

# PHP only, required if PHP was built with --enable-force-cgi-redirect
fastcgi_param  REDIRECT_STATUS    200;
其实这个文件和 /etc/nginx/fastcgi_params 的区别就是第一行增加了
fastcgi_param SCRIPT_FILENAME $document_root$fastcgi_script_name;
如果没有这行代码,那么 PHP-FPM (FastCGI Process Manager) 就没法执行当前目录下的文件,从而造成 502 错误
然后新建立个 snippets 目录
mkdir -p /etc/nginx/snippets
增加一个 /etc/nginx/snippets/fastcgi-php.conf 内容如下
# regex to split $uri to $fastcgi_script_name and $fastcgi_path
fastcgi_split_path_info ^(.+\.php)(/.+)$;

# Check that the PHP script exists before passing it
try_files $fastcgi_script_name =404;

# Bypass the fact that try_files resets $fastcgi_path_info
# see: http://trac.nginx.org/nginx/ticket/321
set $path_info $fastcgi_path_info;
fastcgi_param PATH_INFO $path_info;

fastcgi_index index.php;
include fastcgi.conf;
测试 Nginx 配置文件语法是否正确
nginx -t
如果没有问题,则输出如下
root@debian9 ~ # nginx -t
nginx: the configuration file /etc/nginx/nginx.conf syntax is ok
nginx: configuration file /etc/nginx/nginx.conf test is successful
如果小伙伴们对这个步骤觉得麻烦,那么,可以直接使用我按照 Debian 官方源的配置文件对比 Nginx 官方源的配置文件修改好的 /etc/nginx 目录,嗯,仅适合新开的机器哦,使用前请先做好备份,否则后果自负
rm -rf /etc/nginx/* && cd /etc/nginx && wget "https://sb.sb.sb/nginx/nginx-conf-latest.zip" && unzip nginx-conf-latest.zip && install -o www-data -g www-data -d /var/www
然后就可以继续往下看了
4、增加 Ondřej Surý 大神打包的 PHP 源并安装 PHP 7.x
Ondřej Surý 是一个来自捷克的大佬,Ubuntu 的 PPA for PHP 就是这位大佬做的,当然少不了 Debian 的源了,下面一步一步来
4.1 增加大神的 PGP
wget -O /etc/apt/trusted.gpg.d/php.gpg https://packages.sury.org/php/apt.gpg
4.2 加入大神做好的源
sh -c 'echo "deb https://packages.sury.org/php/ $(lsb_release -sc) main" > /etc/apt/sources.list.d/php.list'
4.3 更新系统
apt-get update
4.4 安装自己需要的 PHP 版本
这个源目前默认的 PHP 是 7.1.x ,如果您需要 7.0.x 或者 5.6.x 那么请修改对应的 PHP 版本号(注意配置文件哦)
这里举例 WordPress 需要的部分 PHP 包
apt-get install php7.1-fpm php7.1-mysql php7.1-curl php7.1-gd php7.1-mbstring php7.1-mcrypt php7.1-xml php7.1-xmlrpc php7.1-zip
对应 PHP 7.0.x 就是
apt-get install php7.0-fpm php7.0-mysql php7.0-curl php7.0-gd php7.0-mbstring php7.0-mcrypt php7.0-xml php7.0-xmlrpc php7.0-zip
修改 php.ini 防止跨目录攻击,如果安装的 PHP 7.0.x 请相应修改 /etc/php/7.0/fpm/php.ini
sed -i 's/;cgi.fix_pathinfo=1/cgi.fix_pathinfo=0/' /etc/php/7.1/fpm/php.ini
4.5 重启 PHP 和 Nginx
systemctl restart php7.1-fpm
对应 PHP 7.0.x 命令如下
systemctl restart php7.0-fpm
Nginx 参考配置文件如下,新建立个 /etc/nginx/sites-enabled/example.com.conf 或直接从本站提供的配置文件 /etc/nginx/sites-available/default-example-php-fpm-7.1.conf 参考修改
server {
        listen 80;
        listen [::]:80;

# 指定网站目录,可根据自己情况更换,建议放在 /var/www 目录下
        root /var/www/example.com;
        index index.php index.html index.htm;

# 默认第一个域名,替换 example.com 为您的域名
        server_name example.com;

        location / {
            try_files $uri $uri/ =404;
        }

# 开启 PHP7.1-fpm 模式,如需要安装 PHP 7.0.x 请修改为 fastcgi_pass unix:/run/php/php7.0-fpm.sock;
        location ~ \.php$ {
            include snippets/fastcgi-php.conf;
            fastcgi_pass unix:/run/php/php7.1-fpm.sock;
        }
}
到这里基本没有问题,可以直接重启 Nginx
systemctl restart nginx
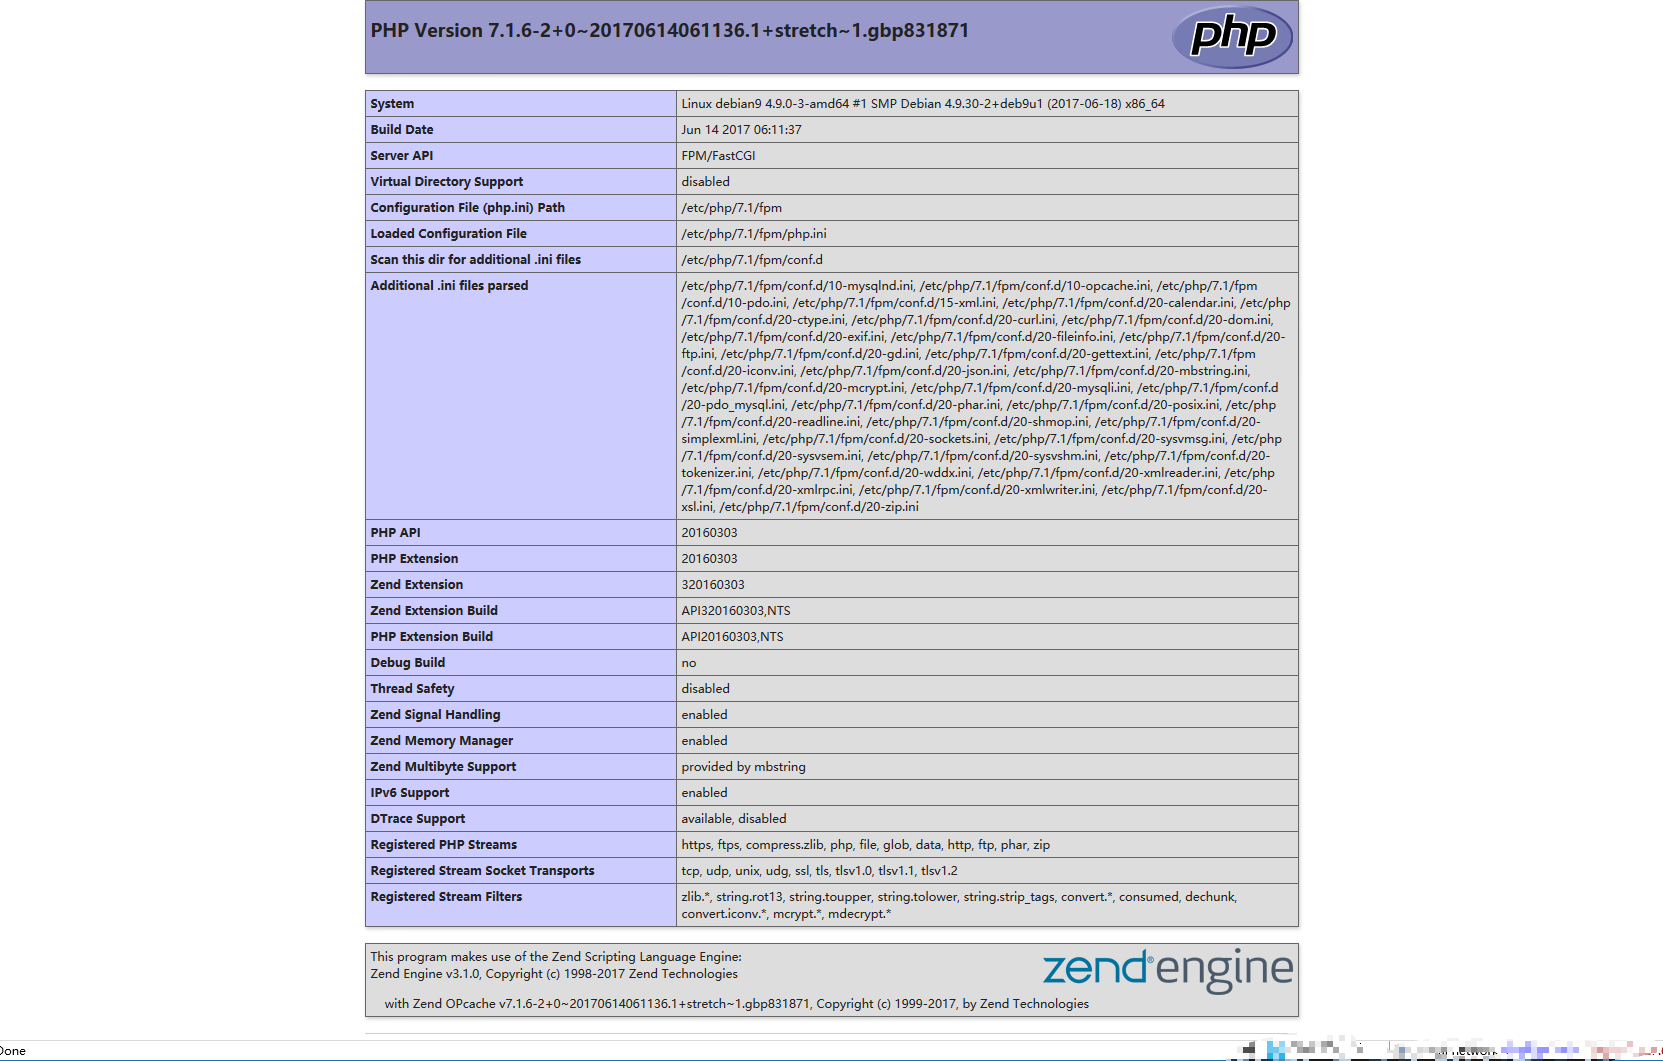
我们的目录在 /var/www/example.com, 创建一个 phpinfo.php 并输入 phpinfo() 函数
cat >> /var/www/example.com/phpinfo.php << EOF
<?php phpinfo(); ?>
EOF
好了,此时在浏览器输入 http://example.com/phpinfo.php,如果看到经典的 phpinfo 页面则说明安装成功,如果不成功,请仔细对比步骤查找哪里出错或在烧饼博客下方留言
效果如下
5、安装 MySQL 5.7.x
由于之前一直推荐的 Percona Server 暂未发布 Debian 9.x Stretch 版本,而 Debian 9.x Stretch 默认已经使用 Mariadb ,所以这里我们用 MySQL 官方源进行安装
5.1 首先,导入 MySQL 的官方源
wget https://repo.mysql.com/mysql-apt-config_0.8.6-1_all.deb
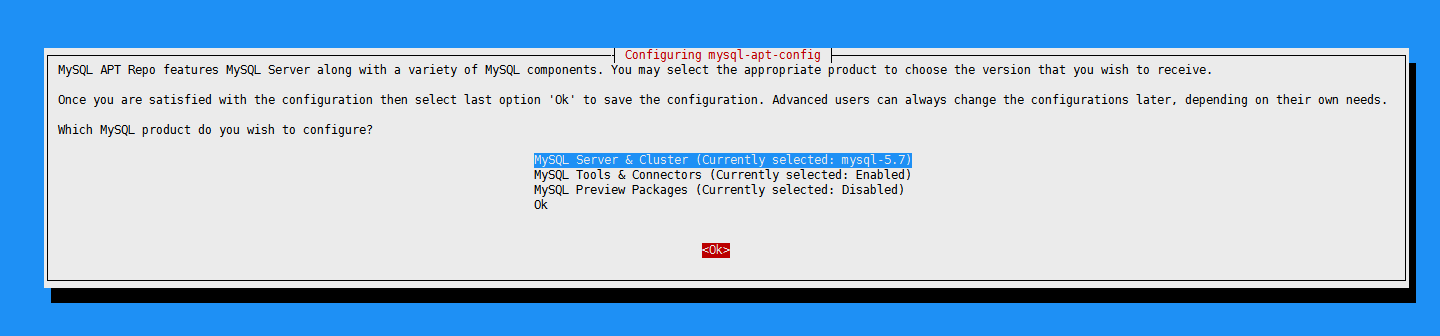
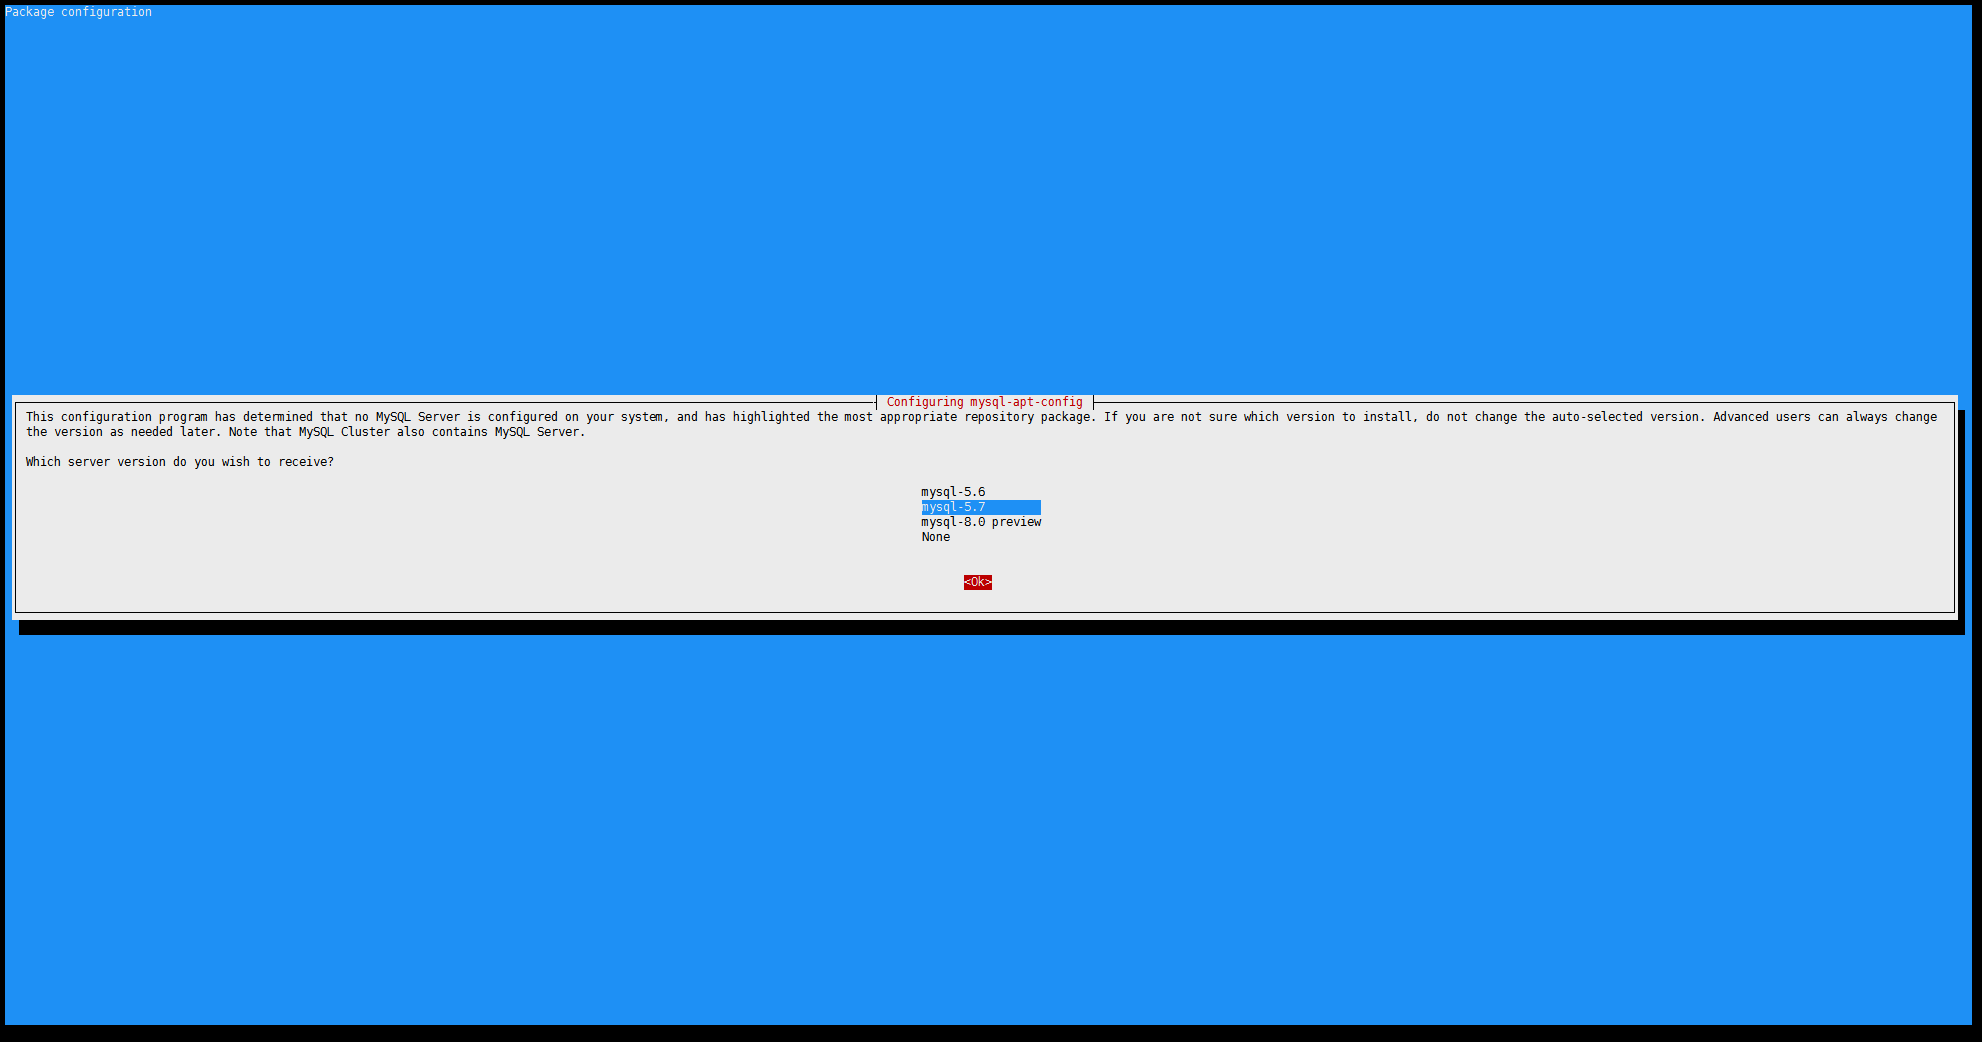
dpkg -i mysql-apt-config_0.8.6-1_all.deb
弹出的界面里直接选择 MySQL Server & Cluster (Currently selected: mysql-5.7 并按 tab 选择 OK 然后回车,版本选择 mysql-5.7 并按 tab 选择 ok 并回车,接着再按 tab 选择 OK 然后回车即可,如图
5.2 接着更新一下系统
apt-get update
5.3 然后直接安装最新版 MySQL 5.7.x
apt-get install mysql-server
在弹出的界面里输入两次随机并且强大的 MySQL root 密码即可,安装成功后检查一下版本
root@debian9 ~ # mysql -V
mysql  Ver 14.14 Distrib 5.7.18, for Linux (x86_64) using  EditLine wrapper
安装完毕后强烈推荐使用 mysql_secure_installation 命令做一次安全设置,详见 Ubuntu Server 16.04.x (Xenial Xerus) 安装 LEMP / LNMP 教程 里面的说明,同样其他的配置都是一样的
5.4 创建数据库并测试
使用 MySQL root 用户登陆
mysql -u root -p
创建数据库 example_database
CREATE DATABASE example_database DEFAULT CHARACTER SET utf8mb4 COLLATE utf8mb4_unicode_ci;
创建用户名 example_user 并赋予权限
GRANT ALL ON example_database.* TO 'example_user'@'localhost' IDENTIFIED BY '这里改成你要设置的强大的没人能猜出来的随机的密码';
刷新 MySQL 权限
FLUSH PRIVILEGES;
没问题以后就可以退出了
EXIT;
新建立一个 /var/www/example.com/mysql-test.php 文件并测试
cat >> /var/www/example.com/mysql-test.php << EOF
<?php
\$dbname = 'example'; //MySQL 数据库名
\$dbuser = 'example_user'; //MySQL 用户名
\$dbpass = '你的强大的没人可以猜出来的密码';
\$dbhost = 'localhost'; //安装在本地就用 localhost
\$link = mysqli_connect(\$dbhost, \$dbuser, \$dbpass) or die("Unable to Connect to '\$dbhost'");
mysqli_select_db(\$link, \$dbname) or die("Could not open the db '\$dbname'");
\$test_query = "SHOW TABLES FROM \$dbname";
\$result = mysqli_query(\$link, \$test_query);
\$tblCnt = 0;
while(\$tbl = mysqli_fetch_array(\$result)) {
\$tblCnt++;
#echo \$tbl[0]."<br />\n";
}
if (!\$tblCnt) {
echo "MySQL is working fine. There are no tables. More information on https://sb.sb/tag/mysql/";
} else {
echo "MySQL is working fine. There are \$tblCnt tables. More information on https://sb.sb/tag/mysql/";
}
?>
EOF
创建完毕后访问 http://example.com/mysql-test.php 如果出现 MySQL is working fine. There are no tables. 则说明 MySQL 工作正常。
好了,以上就是基本的 Debian 9.x "Stretch" 安装最新版 LEMP 的教程,如有问题可以随时发评论留言讨论。


非常感谢,对我是很有用的资料!
@zhz: 能帮助到就好